Thursday, July 28, 2011

Adventures in Embroidery II

Hello Stitchy Friends!

So sorry I haven't been around for the last week or so. I've just been having one of those times where a lot of little things - which wouldn't be so hard to deal with on their own - have all piled up one on top of the other and become A Major Headache. Would you believe that I haven't put a single stitch in anything lately? *Sighs*

However, I'm happy to be back today, sharing the long-promised test piece done for my Bluebirds of Happiness, which was done as a test piece for my current WIP, Twilight Angel. Whew! Sounds silly, I know, but it really did help to do this little experiment. Honestly, when I was working on the Bluebirds, I never intended to use French knots for the middle of the flowers. Although it turned out, remarkably!, that I did so, I never ever would have added them if I hadn't done this little piece first, which I'll call Bluebirds Test Piece for obvious reasons.

Here's a overview of the project:


As you can see, I worked with the same blue cotton and floss colours from the Bluebirds of Happiness. In fact, all of the flowers, excepting the three in the bottom left-hand corner (which were the result of my trying to make flowers free-hand), are from the Bluebirds pattern; I cut a snippet, of the three flowers on the end of the right-hand branch, from my transfer, and ironed it randomly onto the fabric, to give me a stitching guideline. Re-using part of the original transfer worked well, although the lines did get fainter with each pressing.

Then I put the fabric into a small hoop (I used a 6" inch) and worked all the pink lazy daisies and the green leaves. I really wanted to see how the flowers would look using a certain type of center, and so I went crazy trying different things that came into my mind. I really do recommend using a hoop - I think it's what made the whole miracle of finally defeating my long-time stitchy foe the French knot possible. You need two hands free to work this stitch, and so trying to hold the fabric in your hands at the same time is all but impossible if you're not an octopus!

Here are some closeups of the flowers:

Top Left


Flower 1 - Satin Stitch, 3 strands of floss
Flower 2 - Seed Stitch, 3 strands of floss
Flower 3 - Padded Satin Stitch, 3 strands of floss

Top Right


Flowers 4, 5 and 6 - French Knots, 1 loop, 3 strands of floss
(I did three of these the same because I couldn't believe that the first one worked, lol)
Flower 7 - French Knots - center knot 2 loops, rest 1 loop, 3 strands of floss

Bottom Right


Flower 8 - French Knots, four (quarter?) loops, 3 strands of floss
Flower 9 - French Knots, triple loops, 3 strands of floss
Flower 10 - Seed Beads, attached with 1 strand of floss
Flower 11 - French Knot, five (quintuple?) loops, 3 strands of floss

Bottom Left


Flower 12 - Seed Bead, attached with 1 strand of floss
Flower 13 - Seed Beads, attached with 1 strand of floss
Flower 14 - Seed Bead Center, attached with 1 strand of floss, surrounded by multiple French Knots, double loop, 1 strand of floss

The seed beads I used are just random ones I had lying around in my bead stash, colour-core transparents (part of a multiple colour-core assortment)  that I picked soley because the yellow core happened to perfectly matched my thread :)

I found the way that the French knots change shape and texture depending on the amound of loops made to be very interesting. I think a lot of it is also the size of the needle that you use. I forgot to mention it in my last post, but for embroidery, you need embroidery needles - sharps, which are what we think of a 'regular' needles. Trying to use a tapestry needle, with its dull point, is not easy!

From the lovely comments on my last post, I have deduced that I am not the only stitcher waging war against the French knot, and so I'm working on trying to do a little picture thing that will explain how I managed these. I've seen so many different takes on the technique through the years, but the one I tried (off the top of my head!) actually worked, and so I'm sticking with it, whether it's proper or not.

Besides the French knots, I really like the effect of the Seed Stitch (Flower #2) and the fluffy effect of the loose French knots done multiple times with only one strand (Flower #14). I think that the latter would look very neat, without the bead in the center, for flowers with a lot of seeds or stamens in the middle. The raised texture is really cool, and I could see adapting it to other things - like animal fur - as well!

Here's a view of the front and back:


I'm still not used to all this carried thread on the back, and this one is really messy, because I honestly did not try to be neat, in case I wanted to take anything out.

So there you have - the test piece for a test piece ;)

This whole embroidery thing is rapidly becoming addicting - it works up so fast! - and I think there might be more such stitchy experiments in the near future!

Friday, July 15, 2011

Argh! A Problem With Commenting

Just a quick note to let everyone know that I have run into a small problem with commenting on other stitchy sites. I can comment on my own, and I had sent off a few comments with no problem, when abruptly my profile wasn't recognized.

And no matter how many times I logged in, it still wasn't recognized. Sound familiar? This was what some others experienced during the last Major Blogger Issue period last month. Sure enough, when I took a look at the Google Help Forums for Blogger, this is a trending topic that is awaiting explanation and resolution.

After the last lot of trouble, The Great Google decided that the problem was in the embedded comment forms, and advised everyone to change their comment forms to the pop-up type. But mine has been the pop-up type since the beginning!

The Great Google, you vex me.

And so, although I was all set to go and catch up with my favourite stitchy blogs, I'll have to wait and hope that this issue resolves itself (or is resolved, hopefully) soon.

In other related news, I'm behind in my e-mails (again!) and hope to get caught up this weekend. My sincere apologies in advance for the delay in my response!

Adventures in Embroidery!

Hot on the heels of my last Stitchy Adventure, in Couching, I somehow got in into my head that I should try embroidery! Now, cross-stitch is, in fact, a type of embroidery. But for all the years I've been cross-stitching, I have had a love/hate relationship with "real" embroidery. As in, I love the look of it but hate to work it.

And on what is my irrational hatred based, you may ask? On a misbegotten, never-finished, free-form embroidery done in the hand (this was before I started using hoops) and discarded after much frustration, never to see the light of day again.

I got as far as some sort of line stitch (whip maybe) and French knots. I didn't even make it to the lazy daisy stage! French knots. So innocent looking, all pretty and round and nestled neatly together in the centers of flowers. And yet so very evil.

Oh, I tried to be patient with them! I have never been one to give up easily, and this was no exception. I made knot after knot in that scrap of fabric, and all of them ended up lopsided, or funny looking, or pulled too tightly (so tightly that I had holes in the fabric) or too loosely (so that they flopped over, never to rise again). And trying to wrap the thread around the needle? I don't even want to go there. And so, at the tender age of (if I remember correctly) eight, I acquired my first Stitchy Foe.

And what a Foe! All these years, the French knot has plagued me! I never ever embroidered again, but it kept invading my stitchery, appearing in patterns I loved and just had to stitch, as flower centers and dots over alphabets, as eyes of creatures and persons alike; in borders, in backgrounds, in figures all over, the French knot surfaced cunningly in elements I could not leave out of the design!

It would not leave me alone, and so I waged war. Yes, I took to slyly substituting seed beads where ever a knot occured, and when that didn't work, I would cross-stitch a filling, or some other clever disguise. But it irked me. Oh, how the damnable, wretched French knot irked me!!! I despaired of ever stitching crewel work, the French knot's favourite stitchy style. And for every work I fashioned a substitution for that I was pleased with, there was one I was secretly not proud of, as I thought the French knot would have been better, despite its demonic, hellish nature.

Therefore, when I bravely embarked on this Stitchy Adventure, I did so with great deal of anticipatory dread. As I mentioned in my last post, the gold loop-de-loops on my Twilight Angel's skirt are lazy daisies. And that's all the instructions said. No diagrams, no helpful tips. Since I had found my couching test piece so helpful, I decided that I would do a lazy daisy test piece too. And so, I set about finding a hand embroidery pattern with a lot of lazy daisy stitches in it, and I hit the jackpot!

It turns out that there are a lot (and I mean a very great many) intrepid stitchers out there scanning in and posting vintage embroidery patterns. Some of them, admittedly, are very cutesy (e.g. bonnet-wearing beribboned kittens curled up in flowered baskets), and others are just plain strange (e.g. the animated, dancing foodstuffs - tomatoes with legs and arms and eyes, waltzing with the cutlery).


I decided on a simple pattern of two bluebirds on a flowering branch, from NeedleCrafter.com, a really neat site with a large design library that appears to be on hiatus for the time being. Why bluebirds? Well, I have a thing for bluebirds of happiness. I don't why, I just do. And so, I present Bluebirds of Happiness:


And what to my incredulous eyes should appear...


...but multiple French knots, tied so neatly its weird ;)


How did I conquer my dreaded Stitchy Foe and make those French knots so neat? Weeellllll. I did a test piece for the test piece. No, really. I actually did. And was totally glad of it. I'm going to put up tons of pictures in the next post as proof!

You may have noticed that there are no in-progress pictures of this work. This is because I was absolutely convinced that I, noted embroidery diaster creator, was going to mess it up irrevocably at some point. And I was afraid to jinx myself!

Now, on to what I did and where and with what:

The fabric is 100% cotton in a dark sky blue; since I wanted the branch to look like it was in the sky, that was a no-brainer. I choose all my floss colours to compliment it.

All stitches were worked with three strands of floss; all colour numbers are DMC.

~ The Bluebirds were worked in Stem Stitch with 798 (DK Delft Blue).
~ The Beaks and Toes were worked in Satin Stitch in 720 (DK Orange Spice)
~ The Branches were worked in Couching using 801 (DK Coffee Brown).
~ The Flowers were worked in Lazy Daisy Stitch using 961 (DK Dusty Rose).
~ The Flower Centers were worked in French Knots using 743 (MD Yellow).
~ The Leaveswere worked in Lazy Daisy Stitch using 909 (V DK Emerald Green).

The eyes of the Bluebirds were done in Satin Stitch using the blue (798).

I omitted the wavy lines on the breasts of the Bluebirds.

What impressed me most about hand embroidery is how fast it works up! I couldn't quite believe that I had the whole thing done in two days (and would have had it done in less time except I kept picking out my lazy daisies: it's very easy to pull them too tight and you have to keep your tensions a little loose to get them round - the very tight ones on the skirt of my Twilight Angel were done that way based on the model).

After I got over my initial trepidation, I actually found the stitching - especially the lazy daisies - very fun, which was entirely unexpected! I also like the way that the long surface stitching in embroidery leaves sections of the floss free so that the lovely sheen of DMC shows in the stitched elements. This is not something we often see as cross-stitchers, since our floss is tightly worked in the fabric. It's pretty!

Here's a picture of the back, and I warn you - it's messy! I was very dubious about this, but my Stitchy Guru Mother has informed me that since embroidery carries its threads from small element to element (e.g. from flower to flower) there will necessarily be more strands on the back. We cross-stitchers are used to closely darning everything and carrying only when strictly necessary, so it was a bit strange:


Honestly, I had a bit of of a hard time at first, especially turning corners with the stem stitch, and my lazy daisies could be a lot neater - I found it difficult to get them to met exactly at the end. And my satin stitch needs a lot of practice - while it seems like the easiest stitch from reading the stitch diagrams, I actually found it the hardest to work in the whole piece, as getting the strands to lie flat and working with the angle is very challenging! Overall, though, I'm quite pleased with it.

I really like this bit of doing test pieces that can stand as projects on their own. It's fun, and useful to try out the techniques, and you have an actual work at the end instead of random scraps of fabric! This is something I can see doing more of. And, despite all my previous feelings to the contrary, I can actually see trying embroidery again. At least simple designs like this (and this and this).

And the French knots? We are happily (on my part) locked in a stalemate for now ;)


(I couldn't resist, LOL!)

Monday, July 11, 2011

WIP: Twilight Angel - Couching!

Happy news! Pleased with the result of my test-piece, Couched Rose, I decided to go ahead and try out the couching on my Angel, and am pleased to report that it's finished! I've got lots of pictures to share! When we last left her, she looked like this:


And here she is in all her gilded glory:


I also added in the backstitched overlay to the skirt band before I started couching, but it's very subtle, and didn't show up well in the photographs.

Some close-ups - The top of her bodice (I may add some beads or something):


Her skirt sash (I really like the ribbony effect, though the tips were hard to curve!):


And her skirt band (which also has the lovely ribbony look):


Overall, I am very pleased with the outcome! There are a few spots where I should've curved the couching more, perhaps, and in the band above you can see a bit of blue there in the second underfold, but I was able to keep my stitches relatively small, and this is essential. Honestly, I don't think I would have been able to do such a neat job of it if I hadn't done my test piece, using the same gold thread, first; following the curves of the rose taught me how to follow the curves of the sash and band. And it was a bit awkward going in places, even with the practice piece experience, because the little curves and twists were quite small.

This is also the first time I've couched on Aida. I debated using Aida for my test piece, but went with cotton to get the feel of the technique first, and I am glad I did. Having done my Couched Rose as a true embrodiery, I was able to adapt the technique to Aida by doing the unthinkable - I went through threads randomly with my sharp "tacking" needle instead of just following the holes in the Aida! This is something I would never have done before, and the smooth look that I was able to attain would not have been possible if I had stuck to following the squares of the Aida (and my tacking stitches would've been a great deal larger and more visible!).

Once I had the outline couching finished, I considered couching the curliques on her skirt as well, and actually started out with that technique. However, I quickly realized that the colour called for (the 1 strand of yellow with 2 strands of gold, tacked with 1 strand of gold), which was used for all the couching work, just sort of vanished into the yellows of the skirt. Also, the extra three-dimensional work looked odd, and distracted from the outline couching I'd already done.

So, after some, er, "reverse stitching", I settled on using three strands of gold and using backstitch to follow the curliques on the pattern. A close-up of the area:


Where each loop-de-loop occurs (which are made with lazy daisy stitch, which I first worked in another test piece that I'll be writing about soon) there will be beads!

Here is my Angel, as she is now, all ready for embellishment:


So I'm very excited about the embellishment process! This will be the most heavily embellished design I've ever stitched, since there's seed beads (in various colours), sequins, and charms! And I have some interesting ideas that are a bit different than the kit suggestions. The instructions are only guidelines, after all! *wicked grin*

EKSuccess Brands Contest!


This is a quick post to let you know about a contest being hosted by EK Success Brands, the umbrella crafting corporation that includes Dimensions cross-stitch and needlework kits, Martha Stewart Crafts, Jolee's scrapbooking supplies, Jolee's Jewels (which has recently been rebranded as Create Your Style With Swarovski Elements) and Perler Beads, among many others.

Although it's been running since June, I just received information on this contest today, via the multi-brand Newsletter (you can select the brands you wish to follow).


The Craft, Tell, Win! Contest offers two prizes of $250 (US) EKSuccess Brands "online gift cards", and entry is automatic upon completion of a product review. The full rules are in this .PDF document; the important facts are that the contest closes July 31st, 2011, and it is open to anyone in the United States and Canada (excluding Quebec) who is 18 or over.

Every completed product review submission counts as one entry, and you can enter as often as you wish. All entries must be written in English, and all the required information on the review from (signified by a red asterik - *) must be filled in for a review to be considered as complete, and thus eligible for entry.

Because I was curious, I went to a Dimesions kit and followed the procedure described in the ad; that is, I clicked on "Write A Review", and then created an account (you need to provide a name, e-mail address and password).

This opens up the Review Form, and it is one of the most extensive I've ever seen. You must provide a star rating, a summary, and a review (of 50 words or more). But you can then add pictures or videos of your work, you can link to 'related projects' on the website, and you can submit feedback to customer service about the kit!

The whole point of the contest, I think, is to get crafters on the product sites, filling out the review forms and making recommendations.

It seems that EKSuccess Brands is aiming to create a sort of crafter's social network, with their Spotted Carnary "community" site (Cross-Stitch and Embroidery is hidden under the General Crafts heading, by the way) which serves as the "Gallery" section of the EKSuccess home website where crafters can post pictures and text about projects made using EKSuccess product lines.

And since the Gallery posts link to the products used,the reviews are another level of 'advice from fellow crafters' to consider. It's an interesting idea, and if you're a crafter who uses EKSuccess products (I know a lot of us stitchers use Dimensions!), now is a good time to try out the review feature if you'd like to do so :)

If you do decide to enter,


And feel free to link to your reviews in the comments, since I'd love to see them!

Personally, I'd be a bit careful, because I can't tell if the review content will become EKSuccess property or not, and that's something you may want to consider before posting up pictures or video of your work, but then I'm paranoid like that ;)

Thursday, July 7, 2011

Stitchy News!


Wow! I can't believe it's been so long since I last did one of these posts. Some of the news I'm sharing today dates from when I was having Blogger problems last month, so while it might not be 'new', as such, I hope that it'll be new to you :)


Moonsilk Stitches recently posted a beautiful colourful floral crewel-work finish of a kit by  Laraine's On Capri (linked to at the end of this post, which shows pictures of the lovely flowers in her garden). Laraine has a wonderful quick pictorial tutorial (hey, that rhymes!) showing how to make some gorgeous gathered ribbon flowers.

I've seen a few different ways to make these, and this is the simplest method by far. I imagine it could be quite versitile though; for example, I can see making them in different sizes and then layering them to make a more complex flower. Or making a whole bunch of small ones and stitching them down to the fabric in a group, to make flowers like hyacinths. Oh, the possibilities! Methinks I shall have to try this ;) 


In related news, I recently came across an interesting post at a blog called Sewn By Sabila, that showed readers how to colour white satin ribbon using watercolour pencils, water, and a paintbrush. Sabila goes through several different ways to get the colour on, and the results she achieved are beautiful - multicoloured ribbons with subtle colouration and colour changes that rival the best specialty ribbons. These hand-made beauties would make gorgeous flowers, and the ability to make your own colour combinations (instead of having to go with a mixed-colour ribbon that you buy) is wonderfully intriguing! You could personalize ribbons for gifts or gift projects, match team/school/group colours...very interesting!


Blackwork designer Jeanne Dansby has added two new beautiful geometric designs to the Blackwork Smalls page on her blog: June Butterfly and Rosa. Both are lovely, and are a great size to use for cards, or any place a small pretty design is needed :)


Shannon, the stitchy blogger of A Bit of This and That, recently decided to shut down her blog for personal reasons, and I was sad to see her go. Shannon is the second person who decided to "follow" me, soon after I set up Eglantine Stitchery, and it was a wonderful encouragement that came at the right time.

This is the first blog I have ever hosted, for anything, and I had a lot of doubts when I first started out, especially about whether anyone out there really wanted to read about me blabbering on about stitchy things. I am a person who is very enthusiastic about the great many things I enjoy, the foremost being stitchery and books, and although I find it exciting, often other people do not. Also, I was aware that my, er, eccentric tastes in designs and techniques was not in accord with the majority.

Therefore, I was happily surprised when Shannon decided to keep blogging! It's touch and go for the next little while, to see if she can recover her blogging mojo, but she has started two new beautiful projects, and I hope that we will get see them develop as they progress!


Mary Corbet, of the always-interesting embroidery blog NeedleNThread, has posted about a number of remarkable things lately:

For those interested in Couching, there are two posts covering some test work Mary did couching gold thread in 'random' curves over laid threads of flat silk and over blue fabric. Both are unique looks, and would make great filling stitches for a project, or a great project in and of itself! Different threads and textures would lend an entirely different look, and varying them in the same piece might be fun.

There is an interesting series of technique guides from the Royal School of Needlework that Mary recently reviewed (going from oldest release to newest): the RSN Essential Stitch Guide for Blackwork, the RSN Essential Stitch Guide for Crewelwork and the RSN Essential Stitch Guide for Silk Shading. I found the review for the Blackwork guide to be very interesting, since the stitch guide covers the two styles of blackwork - geometric and pictorial 'shading' - as seperate stitch types.

I was awed by the idea of an embroidered framing mat that Mary presented, using works submitted from an exceptionally talented stitcher, in a three-post series: the inspiration post, a closer examination of another picture using gold thread and pearls, and the revelation of the special and extraordinary nature of the pictures being framed. I have never seen an embroidered or beaded framing mat before, let alone one of such intricate design, and the works are gorgeous. I love the idea of making a custom mat that way, and the balance that is achieved, wherein the design complements but doesn't upstage the picture, is enviable. This is a fantastic idea, especially for treasured antique photographs or heirloom stitcheries!

Speaking of heirlooms, Mary wrote a post called Needlework Price Tags: The Things We Save For about forgoing certain projects in order to save up and attend a conference. While the post is interesting, it is the thoughtful comments from readers (almost 60!) about how and why they spend money on stitching, and what that means to them, that are of most interest. Sewn By Saliba references Mary's post and provides another take on the subject from her perspective as an Etsy seller.

Also, Mary has recently started a new section on her site, Ask & Share, where readers can interact, ask questions, provide input and show off their projects!


I'm sure I'm forgetting something (*rolls eyes*), but that's it for now! I hope that you find something of interest, and - as always - Happy Stitching!


Tuesday, July 5, 2011

Some Couching Resources

Since I've been exploring couching for my >Twilight Angel (my current WIP), and enjoyed stitching my test piece, Couched Rose, so much, I've naturally been doing a bit of research on the technique and its applications. Surprisingly, the technique is so simple (lay a thread on the surface of your fabric, use a smaller thread to 'tack' it down at periodic intervals) that it really doesn't get much attention or in-depth application. Although the method of work is simple, especially when compared to more popular embroidery stitches, I think that that it has endless possibilities when you vary materials (you could couch threads, ribbons, braids, yarns, specialty fibers - anything you can stitch around, you can couch down!), colours and textures.

Plus, I think its versatility is overlooked. It works beautifully to outline other stitches or design elements (especially those with curves!), but it can also be laid in rows, or loops, or trellis patterns to make a simple but very striking filling!

And, while working with the fine threads I used for my Couched Rose, I could easily imagine picking up a seed bead - or several! - with my "tacking thread" when I took a stitch, which might be an interesting look.

I find the possibilities very intriguing, and really hope that you will too!

Since my point of departure into learning about this stitch was my >Twilight Angel, I first went to Dimensions (as she is a Dimensions Gold Petite kit) for further instruction. Although the kit directions specified which threads should be couched where, they did not include any stitching diagrams. Helpfully, there is a resource at the Dimensions Needlecrafts website that shows the basics of the stitch.

Another resource I found helpful was a quick tutorial at The Stitch School Blog, which is a project blog run by a graphic designer named Janet in Pennsylvania, that explains basic embroidery stitches to beginners like myself. She includes step-by-step photos, which is very helpful, especially since she uses contrasting thread colours (blue and red) for the "laid thread" and the "tacking thread".

The British magazine, STITCH with The Embroiderer's Guild, has a longer "lesson" article called Laying It On The Line, by Jan Beaney, that provides point-form stitch information followed by some very innovative uses of texture in fibre arts. While these works are far from cross-stitch, and cross into the "art textiles" world, it is useful as inspiration for experimenting with different materials.

Most designs play off width very well, using thin fibres and much thicker fibres in the same piece. This idea could be extended to various other contrasts as well: shiny vs. matte, fluffy vs. flat, fuzzy vs. neat, natural vs. synthetic. Oh, the possibilities! :)

Next, I went on to look at historical information, which was very enlightening.

The next three resources are antique books that are in the public domain, made available to everyone, by Project Gutenberg. If you're not familiar with this site, all of the texts collected, on many diverse subjects, are available for free download, in a wide variety of formats, and are transcribed by volunteers who wish to facilitate the exchange of knowledge by providing copyright-free works to the public.

I have not produced the complete texts here, as they are rather lengthy. Rather, I'd like to give a quick review of the couching section only, with page numbers, so you can quickly navigate to that area of the document to have a look for yourself.

However, I have added in some diagrams, to give you an overview of the material.

The Handbook of EmbroideryView Online; Download.

Section: "Couching" or Laid Embroidery, pages 40-45.

Lady Alford opens this section by stating that: "This name ["couching" or laid embroidery] is properly applied to all forms of embroidery in which the threads of crewel, silk, or gold are laid on the surface, and stitched on to it by threads coming from the back of the material."

She starts with "Plain Couching or Laid Embroidery", by which she means the traditional lay-and-tack method, illustrated as a filling for a scrollwork element:


Next, she describes two stitches without diagrams: "Net Couching": " The fastening stitches are placed diagonally instead of at right angles, forming a network, and are kept in place by a cross-stitch at each intersection", (41) and "Brick Couching": "The threads are laid down two together, and are stitched across at regular intervals. The next two threads are then placed together by the side, the fastening stitches being taken at the same distance from each other, but so as to occur exactly between the previous couplings. Thus giving the effect of brickwork" (41).

The curiously named "Diaper Couching" is described in more detail, and appears to be quite a versatile stitch: "By varying the position of the fastening stitches different patterns may be produced, such as diagonal crossings, diamonds, zigzags, curves, etc.", as illustrated in this trio of stitch examples:


Lady Alford notes that this stitch was traditionally used in gold-work (embroidery with real-metal threads, often ecclesiastical), but could be adapted for silks.

Lastly, she addresses a more complicated variation, the "Basket Stitch", which is also more commonly worked in gold-work. Lady Alford writes: "Rows of “stuffing,” manufactured in the form of soft cotton cord, are laid across the pattern and firmly secured. Across these are placed gold threads, two at a time, and these are stitched down over each two rows of stuffing. The two gold threads are turned at the edge of the pattern, and brought back close to the last, and fastened in the same way. Three double rows of gold may be stitched over the same two rows of stuffing. The next three rows must be treated as brick stitch, and fastened exactly between the previous stitchings, and so on, until the whole space to be worked is closely covered with what appears to be a golden wicker-work."


The rows of soft cotton serve to pad the "laid threads", lifting them off the fabric surface, while the tacking stitches serve to pull down and secure the thread sections, thus giving it a three-dimensional look. The staggered groupings of three tacking stitches result in the "woven" look, like a basket, or (viewed horizontally) like bricks.

Art in Needlework: A Book About Embroidery by Lewis F. Day and Mary Buckle, London: 1900. View Online; Download. Section: "Couching", pages 122-130.

The authors start off the section quite frankly by stating: Couching is the sewing down of one thread by another...When a surface is covered with couching, as in the seeding of the flower in the sampler...the sewing down stitches make a pattern—all the plainer there, because the stitching is in a contrasting shade of colour. It is quite permissible to call attention to the stitching if it suits your artistic purpose. To disguise it by sewing through the cord is not a workmanlike practice. A worker should frankly accept a method of work and get character out of it." Okay, then!

They use a sampler for illustration:


This is followed by a section on couching with looped thread, which sounds very interesting; however, no information is given on how to work the stitch, and the picture is not illuminating. Also, although there is a bit of information on Reverse Couching, which occurs when the tacking thread is pulled so tightly that the tacking stitches "sink" to the reverse of the fabric, the illustrations (of front and back) are misleading, as the tacking stitches are worked over a large block of satin stitch, and this prevents the 'sinking' from occurring. If a single "laid thread" were used, it would appear to 'ident' where the tacking stitches have been taken.

This is pretty much the limit of the Couching section. However, the authors refer to diagrams that incorporate couching with other stitches in the Laid Work section, and couching continues on into the next section, Gold Couching (including Silver), and goes into the next section on Applique as well.

Indeed, one of the most confusing aspects of this book is that it showcases illustrations of works that use many techniques, and so one is forever jumping through the sections trying to see what is being mentioned. And, since the illustrations are not labelled with the stitches used, it can be frustrating trying to figure out exactly what has been used where, and how! Thus, Art in Needlework is more of an inspiration guide and history lesson than it is about any one technique.

By far, the best example of couching appears near the very end of the book:


This lovely example is referred to as "Simple Couching on Linen", and appears in the section towards the end of the text called A Plea for Simplicity in which the authors appeal to the stitching public to bring back the simple stitches and forms that previously existed, stating (quite amusingly): What one misses in the work of the present day is that reticent and unpretending stitchery, which, thinking to be no more than a labour of loving patience, is really a work of art, better deserving the title than a flaunting floral quilt which goes by the name of "art needlework"—designed apparently to worry the eye by day and to give bad dreams by night to whoever may have the misfortune to sleep under it."(!)

In this appeal, there is also a noted concern that the stitches of a stitchery stay visible - that the method of work be evident in the work itself, so that there is no resemblance to the new mechanically woven textiles, which heavily borrow the geometric forms and patterns of traditional peasant and ethnic embroidery. They add "There is a similar objection nowadays to some stitches, such, for example, as chain-stitch and back-stitch, which suggest the sewing-machine."

Indeed, the whole text can be seen as a series of examples of hand stitchery designed to showcase the variation and beauty that can be achieved using different stitch methods; it is not a stitch guide or how-to manual, but rather a manifesto arguing for the preservation of traditional embroidery in the face of the increasing popularity of manufactured commodities. Reading Art in Needlework is very eerie in that way, as it was well ahead of its time; the same argument could be made today.

I did not understand the emphasis that is placed on exhibiting the tacking stitches in the Couching section until I read the Plea (indeed, I had thought invisible tacking stitches were the pinnacle of couching success, unless they were deliberately made to be decorative!), when it became obvious that it was stressed in order to make the couching appear 'hand done' instead of 'machine made'. Interesting thought!

And finally, we have the most straight-forward text of all (despite its name!):

Embroidery And Tapestry Weaving: A Practical Text-Book of Design and Workmanship By Mrs. Archibald H. Christie with Drawings By The Author And Other Illustrations, The Artistic Crafts Series of Technical Handbooks, by Grace Christie, London: 1912. View Online; Download

Section: Methods of Work, Chapter VII (not paginated).

The book opens with this quote:

"Flowers, Plants and Fishes, Birds, Beasts, Flyes, and Bees,
Hils, Dales, Plaines, Pastures, Skies, Seas, Rivers, Trees,
There's nothing neere at hand, or farthest sought,
But with the needle may be shap'd and wrought."
John Taylor ("The Praise of the Needle").

The most recent book, Embroidery and Tapestry Weaving, is a very informative text, and is written in an easily understandable manner with very practical illustrations. There are a great many other embroidery stitches covered in this book, which makes it a good starting point for beginning embroiderers (like myself!).

Christie defines couching this way: "Couching is the name given to a method of embroidery in which one thread is attached to the material by another one. Sometimes not only one thread but a number of threads are couched down together; or it may be cord, braid, or metal thread that is attached to the material in this way." She notes that although couching is often used in gold-work, it is best worked in a special technique more suitable for the fragile real metal threads, and states that gold-work couching methods are not to be used with regular embroidery materials. This is useful to know!

This text has a wonderfully clear diagram of in-process couching:


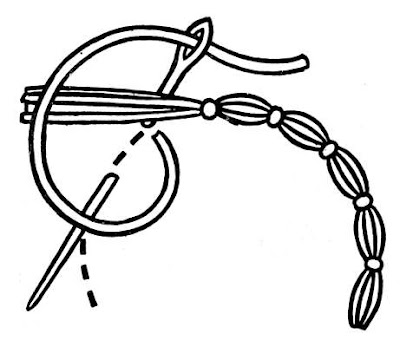
She talks about the versatile nature of the stitch, and provides another illustration of couched work used as a filling for a shape (in this case, a rectangle):


Christie then addresses two very novel and interesting uses of couching: "Braid Work" and "Strap Work". Braid Work is as the name implies - couching using braided trim for your "laid thread". Although it takes extra effort to get the edges of the braid to the back of your work for darning, she notes that the thick braid has a wonderful texture is most suitable for what she terms "Strap Work", or works that consist of interlaced lines, like this example:


The illustration design has a lovely Celtic Knot like effect, and would be suitable for other materials that could more easily be passed through to the back of the fabric. I believe, from the description, that the braid is meant to be passed on the surface when doing Strap Work, but if one was to use embroidery thread, it might be possible to go down into the back at the end of each line.

Christie notes that "Curves and sharp corners need special attention by way of extra stitches", which is what I realized when I was working my Couched Rose.

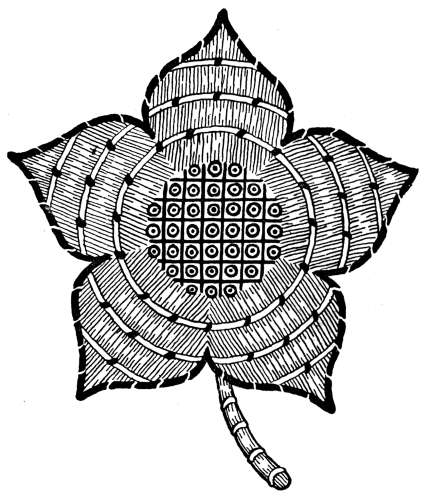
Interestingly, the Laid Work is also addressed, not as a different stitch but as "couching on a more extended scale—a given space is covered with threads taken from side to side in parallel lines close together, fixed at either extremity by entering the material". There are different ways to work the stitches that tack down the laid work, and couching is only one of them. But she suggests that couching can be combined with laid work and other stitches for a very pleasing result, and includes this stitch diagram:


This simple flower is filled with Laid Work, held down with the spirals of Couching (the black marks are the tacking stitches), and the center is a checkerboard of Couching with French Knots in the middle! The outline of the flower is also worked in Couching, presumably with a different colour.

The mix of textures here is quite intriguing!

hristie includes another diagram, of a leaf, to further illustrate that Couching makes a wonderful and neat outline (and overlay - leaf veining, in this case) to laid work, which is liable to have uneven edges that can look quite unsightly.

Of the three antique books reviewed, this is the shortest section on Couching but is, perhaps, the most informative, for the clarity of its diagrams.

I hope that you've enjoyed this review of helpful couching resources!

This article turned out rather longer than I had intended, but if you are interested in the technique, I think you'll find something of interest here.

Truthfully, I hadn't expected to find much information in the historical books I looked at, but was very pleasantly surprised. With the increasing amount of public-domain books becoming available, I am glad to see that the embroidery books are being transcribed, as they still have relevance today, especially when trying to find information on lesser known stitches - like couching! - and different ways to work stitcheries. It is also nice, I think, to read about the history of the craft and the ways that older stitching was worked. <

After all, it's always beneficial to learn the "rules", so that you can break them! ;)

Sunday, July 3, 2011

Wowzers! I Won an Award!

Thanks to Flossy, of the wonderful Flossy Bobbin, I have been given a blog award!


I've seen these around, but honestly never thought I'd receive one! I'm immensely flattered that Flossy considers me one of her favourite "crazy creative people" ;)

Flossy also deserves a lot of thanks for being incredibly patient with me, since I was awarded this ages ago, and have been meaning to pass it on ever since! If you visit the post where she gave out the award, you'll see a pic of her yin-and-yang doggies, Minnie (the white one) and Montie (the black one), but be sure to visit this post to see the super-cute Minnie get her model on with Flossy's adorable crocheted flower collar :) Flossy also has an Etsy store, which sells her adorkable geek-chic blackwork robot pattern among other neat things!

There are three requirements to fufill to accept the award:


1. Thank the Person Who Awarded You

Thanks very much Flossy! I love reading your blog and seeing what neat creative thing you're doing, stitching and other-craft wise :)


2. List Seven Things About Yourself

Since the focus of ES is stitching, I thought I would share some stitchy things:

1. I have never worked with linen and am trying not to do so...
Because I'm honestly afraid that I'll become a 'linen snob', and I have too many kits and designs using Aida that I want to stitch! Plus, linen is not widely available here :)

2. I had never photographed the back of my work until Floral Teacup...
As I was afraid that the backs of my works were too messy! This used to bother me a lot when I was younger, not because of any criticism, but because I thought I could do better. I've learned that 'better', for me, means leaving longer tails, and darning in more securely, as I want the works to last and not unravel. Even though it means more 'mess'. And I'm going to take pictures from now on!

3. I haven't shown any of my jewellery yet because...
I really need to learn to take better photos, a la Dancing in the Rain! For all the years that I've been making beaded jewellery, I have seldom ever bothered to photograph my work, and I'm going to try to remedy that sometime in the near future!

4. I have never worked with silks...
But am intrigued by watching other stitchers use it, and would like to try it sometime.

5. I greatly admire the works of video-game stitchers...
Like Flossy (@ Flossy Bobbin), Karyn (@ A Riot Patch of Pixels), Cibo (@ CiboStitch) and Evening Emma (@ EveningEmma), even though I am regrettably not hip to most modern video games. I had a deep and abiding love for the Super Mario Bros. when I was younger that I never grew out of (especially SMB3!), and I love the look of any retro pixellated game. But I have no experience with what's hot now, and cannot play first-person shooters at all. Not even when the targets are really bad guys. So, in short, I love video games, but can't kill anything beyond the occassional goomba (i.e. frowny mushroom from SMB). 

 6. I greatly admire stitchers who work historical stitcheries...
But I will never be one of them. While I believe the attention to tradition that is involved in working accurate reproductions of antique samplers and stitching in the 'primitive' style is commendable, I love working with new materials and bright colours far too much to adopt that manner of work with any consistency.

7. I have always wanted a pair of fancy needlework scissors...
But stork scissors freak me out! It's the whole beak-as-blades thing I think. Plus, I had a nightmare once where I had a real stork with a scissors-blade beak chasing me(!). I'm not so bad with the peacock scissors, since there's only a suggestion of feathers on the handles and no beak in sight, but I'm holding out for a pretty filigree floral pattern, without any sign of birds at all!


3. Pass the Award to 15 Other Stylish Bloggers

Wow! There's so many stitchy blogs that I get inspired by reading. Flossy's already given the award to Jeanne at Byrd's Nest, Karyn at A Riot Patch of Pixels, and Ziggyeor of Ziggyeor's Loopyness so they are not on list due to that :)

Also, Ági's wonderful blog, The World According to Ági, is not on the list, as she is one of the people who gave Flossy the award. 

And since I don't think I can give the award back to the person who awarded it, Flossy is not on this list, although she certainly deserves it ;)

I'll be sending out e-mails/leaving comments to let you know. If, for some reason, you haven't gotten a message in your e-mail or a comment on your most recent post (for those who do not have their e-mail address available), please e-mail me (address in sidebar, under "About") to let me know.

I've ordered the list alphabetically for ease of reading! Although it was hard to limit the list to just 15, these are some of my very favourite stitchy bloggers. I am a follower of all of these blogs, and they are all listed in my sidebar :)

1.   A Bit of This and That (Shannon)
2.   Cibo Stitch (Cibo)
3.   Crazy Cross-Stitcher (CrazyStitcher)
4.   Dancing in the Rain (Rainy Day Stitcher)
5.   Epic Stitching (Mel)
Although Mel has recently taken a blog sabbatical for medical reasons, there is still plenty of interesting posts to read in her archives, and I'm hoping that she will accept the award when she is able to return to her stitching.
6.    Erica's Stitches (Erica)
7.    Evening Emma (Evening Emma)
8.    Karen's Colourful Creations (Karen)
9.    Meari's Musings (Meari)
10.  Moonsilk Stitches (Moonsilk Stitches) 
11.  Mtrl Girl's Material World (Christine)
12.  Stitch Days (Rita)
13.  StitchinKat's Pawprints Blog (StitchinKat)
14.  Stitching Stuff (Amanda aka Z)
15.  Therapy By Thread (Blu)

Best wishes for Happy Stitching to you all!